Showing posts with label easy. Show all posts

Monday, October 7, 2013

DIY CANVAS ART


This week we bought a bunch of canvases to make some wall art for our houses! I have a lot of smaller pieces but really needed some larger art. These canvases were on sale at 5 for $25 so we jumped on it. I made the anchor one based on a giant cross-stitch piece that I saw, but mine is made with just paint! I counted out 29 "rows" and divided that by the available amount of centimeters on the back. I did some measurements to try to make everything centered and evenly spaced and drew the Xs on the back using pencil. Then held up the canvas to the light in order to see through and I just had to paint on my Xs!


Amy painted the diamond and our friend Alix painted on the antlers. Until we can afford actual art this will have to do!

For some more DIY art ideas check out some of our other projects like paint by number updo, geometric paint sample art, nail and string art, or vintage book picture display!

-Jerica-

Monday, February 4, 2013

BAKED KALE CHIPS


I have found my new obsession. Baked Kale Chips. That is all. 

Oh and here is the recipe! It is so simple! 

Ingredients:
Kale 
Sea Salt
Black Pepper
Olive Oil 

1. Chop kale in large pieces and without stem and make sure it is dry!
2. Toss in a little olive oil - do not drench it! just enough to coat it lightly
3. Add some salt and pepper ( be careful to not add too much!)
4. Bake at 350 F for 12-14 minutes
-Amy-

Wednesday, December 19, 2012

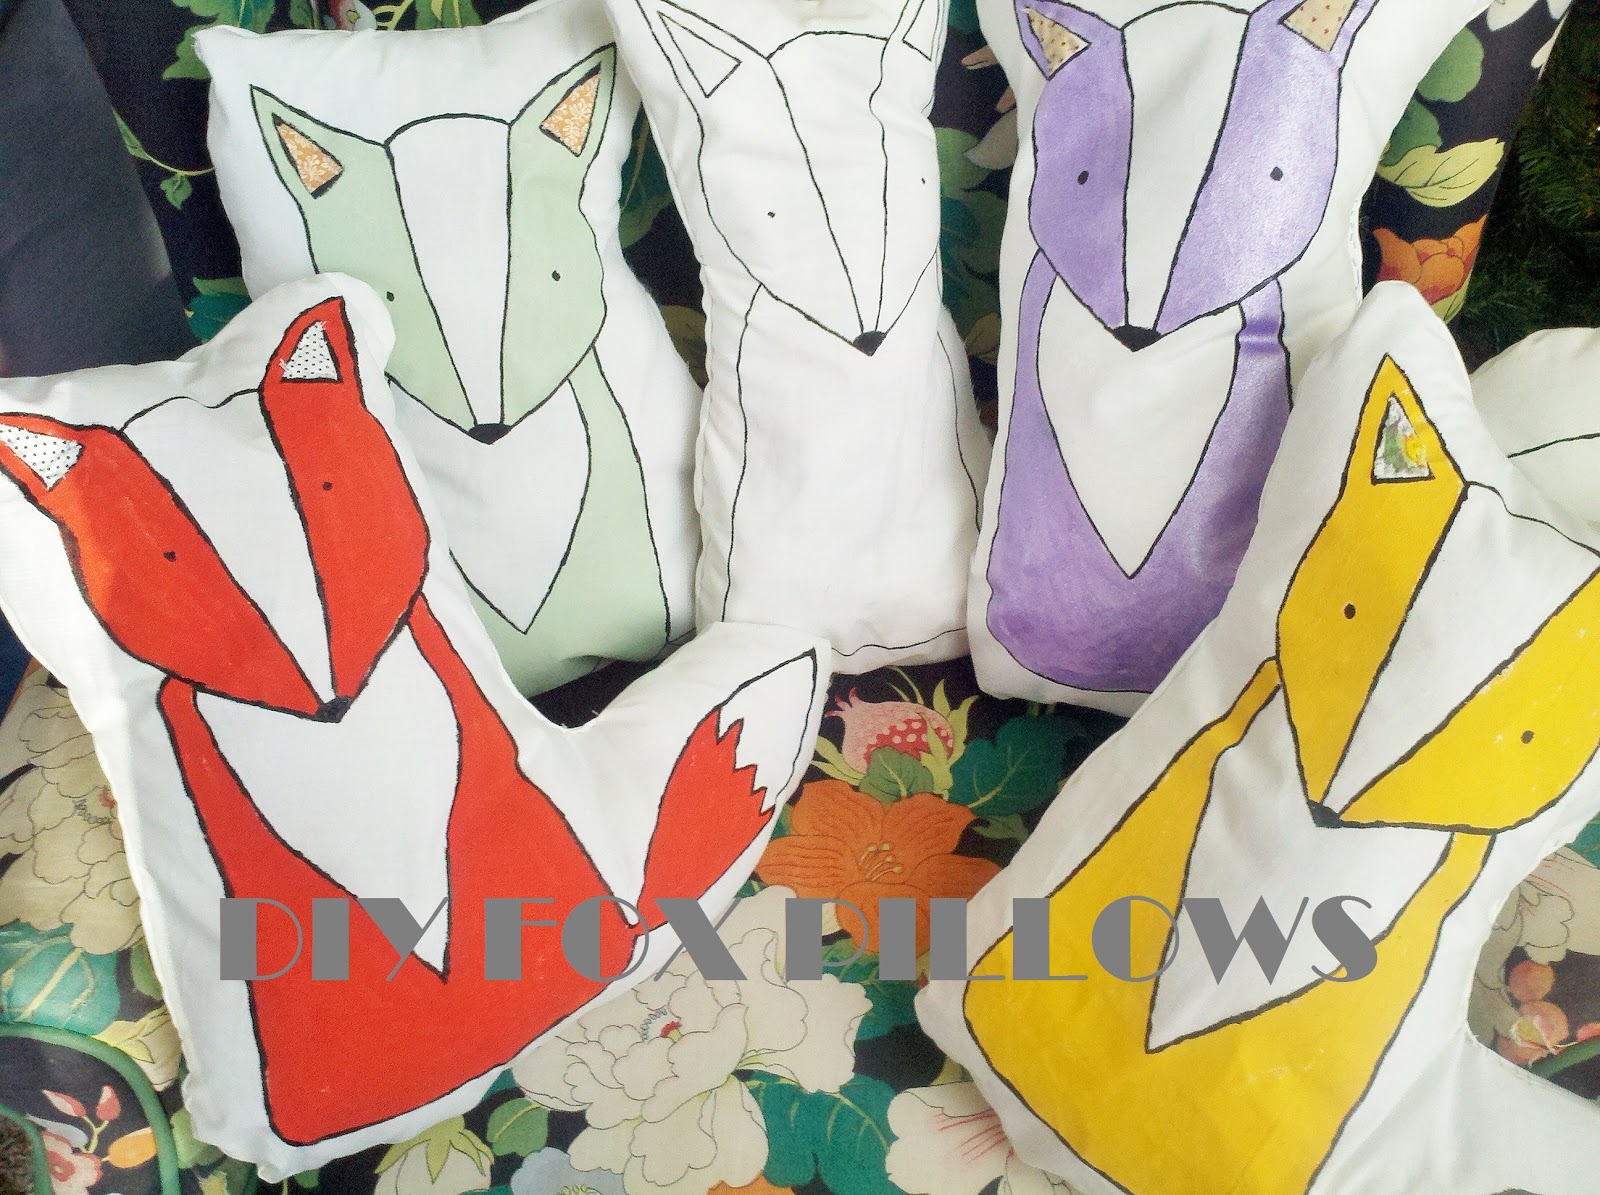
DIY FOX PILLOW


Foxes are all the rage right now. And I am quite alright with that! This makes a great DIY christmas gift if you have still been procrastinating! I don't have a sewing machine so mine were all hand sewn, and one fox took me a bit less than an hour. There are a lot of fox pillow variations right now on Pinterest so this is a mix of several versions I saw around. Here's the low down..

MATERIALS
White fabric ( I used an old white sheet from the thrift store)
Fabric scraps
Fabric paints
Paint Brushes
Sewing needle and thread (or sewing machine)
Cotton (I used Poly-Fil from hobby lobby)

DIRECTIONS

1. Use a pencil to draw your design on the white fabric! I free-handed mine for the first fox, then painted all the lines in black paint. I placed this underneath white fabric to use it as a stencil to trace all the other foxes. You can use different shapes for the chest/belly or for the tail. 

 2. Cut out the drawing, staying about an 1 1/2 inches away from it so there is extra fabric to sew.

3. Paint the base color of your fox. It is okay if your lines aren't perfect because you will then use a fine tip paint brush to paint the black border. You can go thick or thin here.

4. Once dry, place a sheet of white paper over the ears and trace the inner ear triangle. Cut out the paper triangle and use it as a template to cut out a piece of fabric scrap that looks good with your paint choice. Sew these to the ears.


 5. Go back to your white fabric and place your fox up-side down onto a new piece of fabric. Cut along the outline, creating a piece of fabric that is a mirror image. This will be the back of the pillow.

 6. Take a picture of  your attention-hog dog sitting on your fox. This step is CRUCIAL.

7. Place the two cut outs on top of each other ( still with the fox facing down) and get to sewing! Leave a few inches un-sewn for a place to put the stuffing in.

8. Turn inside out, and fill with stuffing! Hand sew up the remaining area and you're done! Easyyy.
-Jerica-


Sunday, September 9, 2012

DIY LEATHER WALLET


This is a fairly easy project. Something I came up with on a whim. While I was shopping for other craft supplies I saw that HobbyLobby sold some small pieces of leather. Which I have been thinking about getting for various other projects I saw on Pinterest. But I got a pretty small strip and not enough to do anything to big or crazy with. It was pretty pricey so I wanted to try working with leather first before I bought a bunch and started something big and destroyed it. Since I am terrible with my cards (I lose them on a monthly basis) I decided to make a wallet with the strip of leather I got.

MATERIALS:Leather
Leather cutter
Thread
Thick and pointy! sewing needle
Scissors
Paint

The strip was pretty much already cut to the width of my cards so I did a rough measurement by sticking a card inside and folding it over hamburger style twice so it made a bottom and a flap- cutting off the excess with this rolling fabric cutter that I found in the basement ( still in its wrapper from like the 90s!) I suckkkkkkk at sewing so the craftsmanship on this is pretty shitty but I’m just going to call it my practice round! I painted the top with some regular paint and just use some of the scrap for an accent piece on it.
-Amy-