

Showing posts with label crafts. Show all posts
Showing posts with label crafts. Show all posts
Thursday, December 19, 2013
OMBRE EMBROIDERY THREAD FEATHERS
Saturday, September 28, 2013
5 FALL CRAFTS & RECIPES
Use some of our past DIYS to get in the moooood for looove (fall)! Click captions for links!


-Jerica-
Thursday, September 19, 2013
ENGAGED!

Guys I got engaged! Actually since my last post, I graduated and got a job doing research! So crafts have been put on the backburner :(. But this engagement party was an excuse for Amy and our friend Alix and I to get crafty! We kind of just all brought things and brought ideas and it came together so amazingly, better than I ever could have imagined! We did not have any particular theme in mind, other than we wanted diamonds. Here are some pictures of the details.
Sunday, December 16, 2012
DIY PICTURE FRAME JEWELRY HOLDER

I have seen a few variations of these jewelry displays on Pinterest and decided to give it a go. I love jewelry and accessories but always seem to lose them. Probably because my idea of storing them is tossing them in a little pile on my desk, floor, purse.. basically anywhere. As you can assume this results in me losing or breaking everything. So this project is right up my ally- something I could use to help organize my jewelry. Now this was not all for me- this was actually a project I did for work. I created these displays ( the big one is for me) for displaying the beautiful and really cool jewelry from my work for our retailers. You can read my other blog here.
Materials:
¼ inch square Wire Mesh Screen
Wire Cutter
Pliers
Scissors
Saw Tooth Hangers
Vintage Frames
Twine
Scissors
Scissors
I did two variations of this jewelry display frame- one with a mesh back and another with twine. All you do is remove the glass and backing from the frame, and staple the material you want and how you want it to the back of the frame. Use your staple gun to secure it on. Cut off excess material. DONE!
So simple. I am a big fan of quick and easy projects. Especially ones that do not require too much clean up. If you're interested in more jewelry holders, check out the animal jewelry holder we made here!
For this Vintage Frame DIY Jewelry Display photo shoot I got to raid our inventory and pick some of my favorite pieces to photograph! You can check out more of the jewelry pictured below at www.Nina-Nguyen.com.

Top Left: Seafoam Stalactite Necklace
Bottom Left: Petal Amethyst Druzy Necklace, Bella Geode Earrings, Bella Ammonite Earrings
Bottom Right: Bella Ammonite Earrings
Friday, December 7, 2012
CABINET UPCYCLE

Unscrew the handles and sand the wood if needed. I sanded down the cabinet doors a bit so that the little varnish it had wouldn't repel the paint. Let the paint dry and apply more layers as needed. Then simply take your paint marker (mine was from hobby lobby, except silver and not 'extra fine') and have at it! I'm curious to see how a different color combination would look!

-Jerica-
Tuesday, October 30, 2012
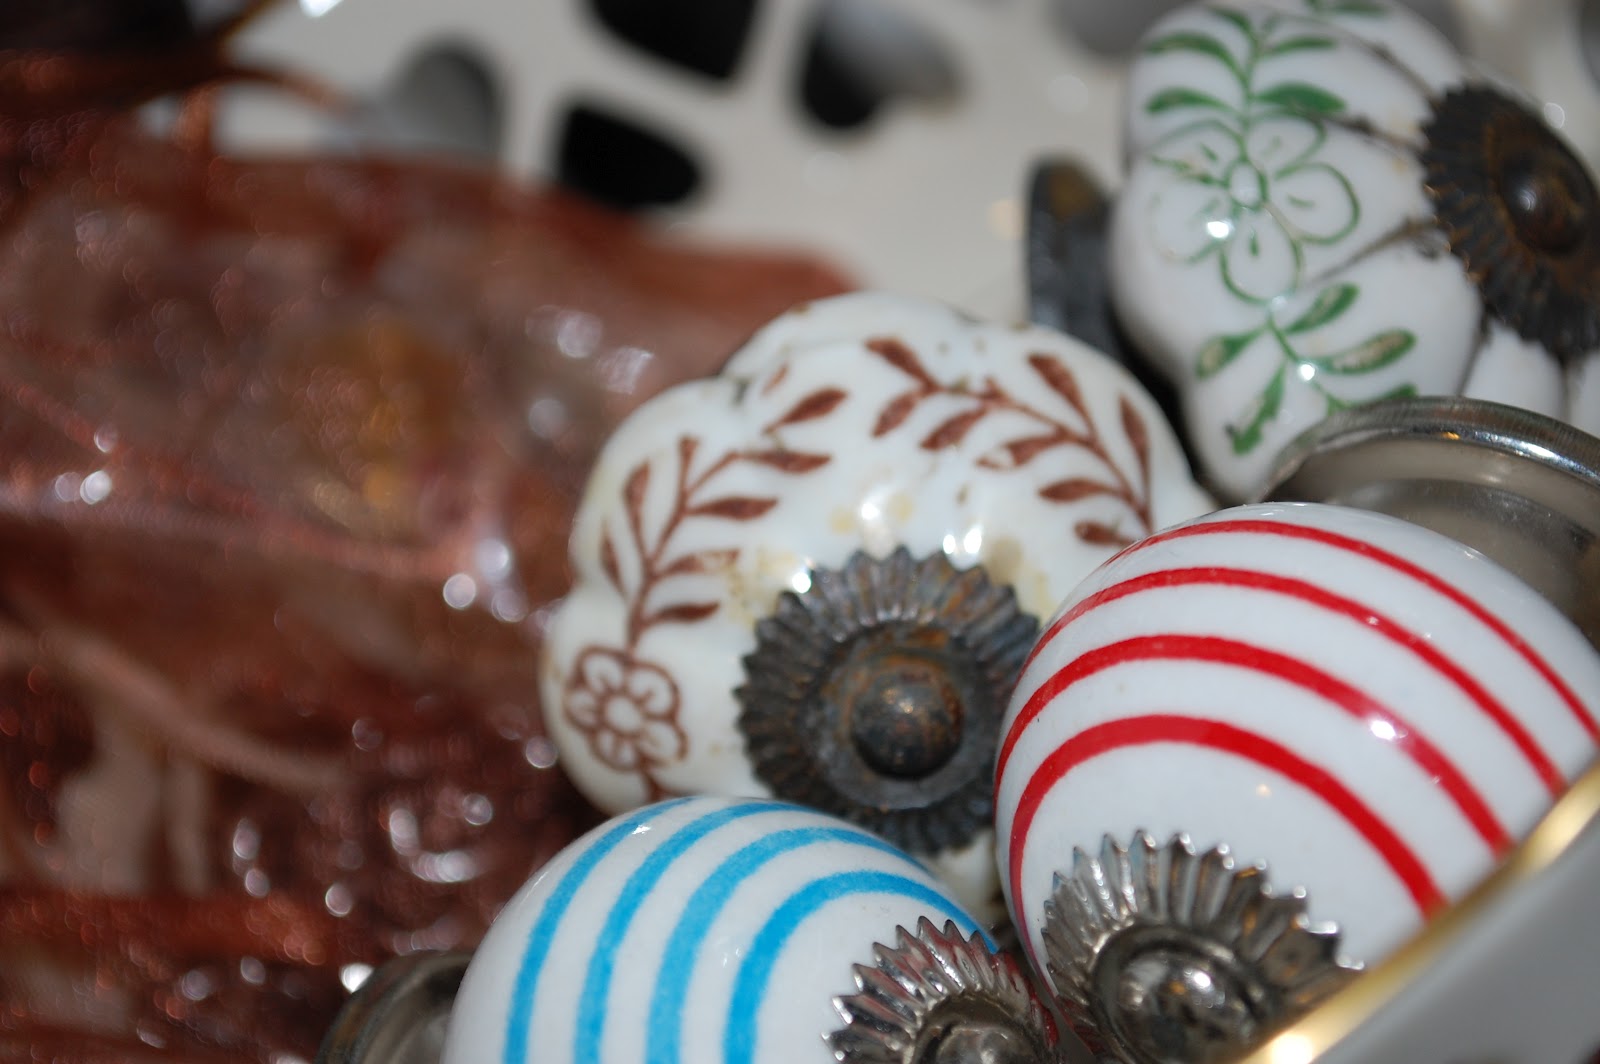
GEODE DRESSER KNOBS


I have been so excited to show off these rockssss I found at an estate sale on a farm! And the best part? I got ten of them for $15! My sister also scored some awesome 30's camera equipment to use as decor, they just had the most amazing stuff! These rocks were in a huge box with tons of different rocks and I noticed a few of them had screws and thought they would make awesome dresser knobs!
You can pretty much make anything into dresser knobs when you think about it!

-Jerica-
Tuesday, October 16, 2012
LAMP REVAMP WITH SPRAYPAINT


I have been wanting to try this foreverrr and I finally took the plunge. Now it's time for you to take the plunge. Spray paint an old lamp, you will be so glad you did. I used a ceramic-type lamp that I got from the thift store but I imagine you could make this work for almost any type of material. If you are painting over a lamp that has a darker color, you will want to spray a layer of white primer first. You can find this in the spray paint section at any craft store!
The color I used from Krylon is a Satin finish called Catalina Mist. I meant to pick up a high-gloss finish which is what everyone recommends, but I got too excited about the color and forgot to even look at it! But luckily it turned out with a glossy finish still.
When spraying you'll want to be sure to stay about a foot away and build the color in layers. Do not get closer than this because the spray paint will pile up too fast and create drips like mine did a little bit :( But I still just love it!
DIRECTIONS
Spray the lamp.
*The picture is a wood transfer I did a while back. Check back for a tutorial on that!
-Jerica-
Monday, October 15, 2012
BOOKCASE UPDO

Do you have a spare hour or two? Do you have an extra bookcase already made and sitting around in your garage waiting for you to do something with it? You do?! Then this is perfect for you, PERFECT! The house I live in was from the 30's and had been in the same family from then until I came around. It was in terrible condition and my dad and I pretty much remodeled the whole thing (okay mostly just my dad). I've been living here three years now, but needless to say, I still find lots of random things around. I found this bookcase buried in the garage and unfortunately was painted a not-so-flattering lime green. I whined to my babygurllll (boyfriend) to paint it for me, and he ended up painting it a cream color that I had lying around from when the walls were painted originally. So it blended in with whatever wall I put it against. I love the trend going around of painting the back wall of shelves, so I came up with this idea to help it pop!

I used painters tape to get the edges of these lines and did not do any measurements because I wanted to have a hand-drawn look (aka I'm lazy). I also changed up the color order in each section to make it look more sporadic. For the colors, I didn't want to have to get large amounts of paint for just a few lines, so I actually used fabric paints I had lying around and they worked perfectly! After lifting the tape there will probably be some bleeding, so just use a very fine brush to touch those spots up. Now I just need a sweet color coordinated book collection like everyone else haaaas!
Sorry the lighting isn't the best in these photos, I live in the basement of the house!

-Jerica-
Sunday, October 7, 2012
FALL DECORATION
Its finally feeling like falllll! We got our first snow this weekend here in Colorado, nothing stuck around but it was still exciting! Unfortunately it seems to always be way too hot or way too cold and we miss spring and fall. Here's a little craft to help you hold on to the changing and falling leaves!


MATERIALS:
A Branch
Plastic fall leaves (I got mine from Hobby Lobby on a stem and plucked them off)
Hot Glue
Thread
It's pretty self explanatory from here, you simply tie a little knot around the stem of the leaves and tie another knot around the branch. For the other leaves that are directly on the branch, I dabbed hot glued the stem of the leaf and pressed them onto little nubs or slid them onto small twigs still on the branch. Mine also came with a little acorns so I put those on too! You could hang these guys on a wall, over your bed, or even tie it to yourself if you like it that much. You could also add feathers or whatever else you can think of!
-Jerica-
Wednesday, September 26, 2012
CHALKBOARD PICTURE FRAMES

Another simple and easy project. I realize that when it comes to
crafting I have ADD. It takes me forever to finish one project before I
start the next. And Pinterest does not help that little problem at all.
This little project I have been meaning to do for over a year!
I have been collecting picture frames for quite some bit of time. I
am attempting to fill up one whole wall with scattered frames. but due
to extreme laziness and being cheap I have been avoiding printing
pictures that aren’t the regular 5x7. Soooo they have basically been
hanging up on my wall blank for a good year. Did it look cool? Not even a
little bit. So today I finally decided to do something about it with
my handy dandy chalk board spray paint.i think the pictures are pretty clear on how I did it…. but if it
requires some directions here is a very very simple step by step.
1. Run the glass in a dishwasher on hot and steam dry to get those stubborn thrift store tags off. Or soak in hot soapy water for a half hour.
2. Follow instructions on the Chalk Board spray paint. It will require a couple of layers and time between each layer to dry.
3. Put back in frame and draw to your heart’s content.

I should also note that I did use white paint on two of the chalk board frames to make the texts more permanent and visible. Sooooo essentially I could have just used black spray paint…but I didn’t. =)
-Amy-
Saturday, September 22, 2012
WOOD BURNING KNOBS

Greatest find ever. Okay maybe not really but I
was pretty damn excited when I found this jar of knobs. I have been
looking for vintage knobs and came across a few in Europe but they were
prettttty pricey! A little fancier but these are awesome
because they are wood!
Whichhhh means I get to use my
wood burner again! I have been going a little crazy with it and its not
the best tool (considering it was 10 bucks) so you can definitely feel
the heat. My hands kind of feel like they are on fire right now…
probably not a good thing but they look okay at least.

I went with the chevron design for my first attempt since it is the
easiest print for me to do and its hard to mess it up. That explains why
everything I do has that pattern, if anyone was wondering. Its just a
good experiment design. So basically did what I have been doing burning and painting
baybayyy. Also if you haven’t noticed there has been a repetition with
the paint I use. Again simple explanation; It's all I have. Everything
else is dried up or quite the opposite, too watery!

Sunday, September 16, 2012
IS IT POSSIBLE TO PUT THIS NIGHT TO TUNE AND MOVE IT TO YOU?

I am getting at that age when all of my dear friends (myself included) are graduating and getting to that point where we are starting to figure what we are doing with our lives and where we are going. Quite the turning point in our lives- I am still trying to figure out if I want to stay here in Colorado or go somewhere far and new. I just need to take that leap! Just like my dear friend Alix! She is off to California in the next few weeks to begin her sweet adventures.
Since she is leaving soon last night we had a little get together with drinks at 303 Distillery in Boulder. One of my favorite place for a chill night. We had a late night out the night before so we wanted to take it easy and shared a few drinks, a Vootbeer and a Dreamsickle. Deliciousssss- both made with gluten free potato vodka. As a goodbye present I made Alix this map highlighting her two homes!
This was inspired by a pin on Pinterest- well many pins. I am not sure which is the original but props to them for their clever creativity! This is my version of it. Since Alix was moving I wanted to make her something related to Colorado and I loved this state/nail/tread art project. However Colorado is possibly the most boring shaped state on the map. Seriously it would have just looked like a box on a board. So I had to brainstorm! I decided to go with the whole country and highlight her two homes California and Colorado.
The process is pretty simple- sorry I didn't document it with photos on my camera so I have a lower resolution version from my ipad that I will include.
It is a lot easier than it looks for the most part.
Materials:
Wooden Plaque
Nails ( 3/4 inch)- try to pick something with a larger head
Hammer
Tread
Print out
Wood Stain
Super glue- with brush
1. Print out shape of the state or shape of whatever it is you want to do for this project.
2.Varnish your wooden plaque with whatever stain you want and let it dry a bit. I was impatient and immediately started working on the nail parts before it dried and pretty much stained my hands and my clothes with the varnish. I also hammered the plaque all over the place to create a beat up old version.
3.Cut out as close as you can to create a template.
4. Lay it down on your plaque. You can also tape it down so it doesn't shift when you're hammering to keep it from sliding around.
5. Hammer the edges down to create an outline. I just eyeballed the spacing. I did them pretty close to create a more defined outline.
6. Once the outline is nailed down you can just rip it out and begin threading!
.jpg)
7. Threading was the most frustrating part- mainly because the nails I chose had pretty much no head to them. This caused the thread to slide right off every time I tried to wrap them around. But if you get a better type of nail then this wont be a problem for you at all. I had to hold each piece down as I wrapped and create a lot of tension to keep it in place. I didn't have superglue till the end of the project but if I did I would brush each nail tip after I was done with the thread to keep them from moving. Instead I did it at the end to sealllll the dealllllllllll!
For the treading pattern all the ones on Pinterest had strings either did it in random directions and colors or one color all coming to one point to make a uniformed looked. I tried both- but with doing the entire United States it just did not look as good to me. So I played around for a bit and eventually made each point to make a triangle. I redid this shape in different sizes and directions until it covered most of the open space. I then did the same with the highlighted states but with a brighter color tread. I also kept all the thread ends hanging to create a vintage vibe to it.
-Amy-
Friday, September 14, 2012
WOOD BURNING OUTLET COVERS

-Amy-
Subscribe to:
Posts (Atom)